Thursday, May 31, 2012

Whats a Gel?

In Hollywood, people seem to believe that science is a bunch of men and women wearing lab coats and safety goggles all diligently mixing various colored liquids together. After many mixes and exasperated sighs, the main character suddenly has an idea and mixes yet another two chemicals together which then begin to glow a strange green color. The men in women then turn and smile at each other because clearly they have just discovered science.

For isolating pure science, we are proud to present you with this Nobel Prize.
Now, to be honest, that isn't really how it works. 

Except if you are running a Gel. 

A Gel is generally done directly after a PCR. Those of you who have read our previous blog posts will know that PCR is a process that copies one section of DNA thousands of times. For those of you who haven't read our previous posts CLICK HERE!

The problem with PCR is that, just like everything in life, it doesn't always work out the way we want it to. 

Personally, I blame Gremlins. 

If the PCR didn't work, we need to know. That's where the Gel comes in. 

To begin, we take a little bit of the stuff we got from the PCR and mix it with a fancy dye. Then we take this and put it in the edge of a jello-like block (thus the name Gel). 

We run an electrical current through the Gel which acts like a vacuum cleaner and sucks the DNA from one side of the gel to the other. 

Imagine now, if you will, a playground at an elementary school. A tiny 6 year old kid can get from one side of the playground to the other in almost no time. This is because they can easily slip through all the little nooks and crannies and tunnels and such. Now imagine a sumo wrestler trying to move through this playground. He would move much slower because he would have a lot of trouble getting through the same tiny areas that the 6 year old could go through.

He'll figure it out eventually.


 A gel works the same way. Smaller pieces of DNA will get sucked through the gel much faster than larger pieces of DNA, which will move faster than even larger pieces of DNA. And so on. This means the DNA is separated out by size. Now if you remember, the PCR produces identical copies of a piece of DNA, which means that all of these copies are the same length. Since it is the same size it moves the same speed, and since it moves the same speed it will move the same distance. The special dye that we mixed with the DNA glows under a blacklight. If the PCR didn't work at all, we won't see anything, but if it did, we will see something like this. 

Each stripe is a different PCR. Don't worry, they won't mix. 
Now, some of you might be wondering "Isn't PCR only supposed to make one piece of DNA? The bit on the left has lots of stripes, which means lots of different sizes, which means lots of different pieces of DNA." 

If you thought that then you are absolutely right! If the PCR worked right we will only get one band. If we get more than that, we probably had a contaminate somewhere. The bit on the left is not a contaminate however, that is what is known as a ladder (because it kinda looks like one). 

See the resemblance?
A ladder is a mix of a whole bunch of different sizes of DNA. We know how large the DNA in each stripe on the ladder is, but we don't know how large the DNA from our PCR is. By comparing the PCR stripe with the stripe it is closest to on the ladder, we can make a rough guess as to what size the PCR DNA is. It basically acts like a DNA ruler.

So in short, a Gel lets us see, if our PCR worked, if our DNA is contaminated, and it lets us make an approximation of the size of the DNA. 

That's all for now! If you have any questions, fell free to post them in the comments section.

By Ben Segee

Tuesday, April 3, 2012

A Visit to a Classroom

Dr. Laurie Connell went to visit Mrs. Worden's fourth grade class at the Miles Lane School in Bucksport, Maine to talk to the class about studying yeast in Antarctica. This is the photo and letter we received back from the class. Looks like it was a fun day for everyone! Thanks for having Dr. Connell come visit!


Dr. Laurie Connell with Mrs. Worden's fourth grade class at the Mile's Lane School in Bucksport, ME


February 2, 2012


Dr. Laurie Connell, a research scientist from the University of Maine, came into Mrs. Worden’s fourth grade classroom to explain about her studies in Antarctica.  She brought us each a crystal from a volcano in Antarctica called Mount Erebus.  You can only get this type of crystal on this specific volcano!  She also brought in pictures that showed her adventures and studies in Antarctica.  She was studying microbes or micro-organisms that eat rocks!  Cool, huh?  She gave our class a flag that showed a microbe eating a rock.  Dr. Connell also signed with her team’s number!  We loved her visit and hope we can find out more about Antarctica!

-Mrs. Worden's Fourth Grade
 Miles Lane School                  
Bucksport, ME                       

Monday, April 2, 2012

As promised

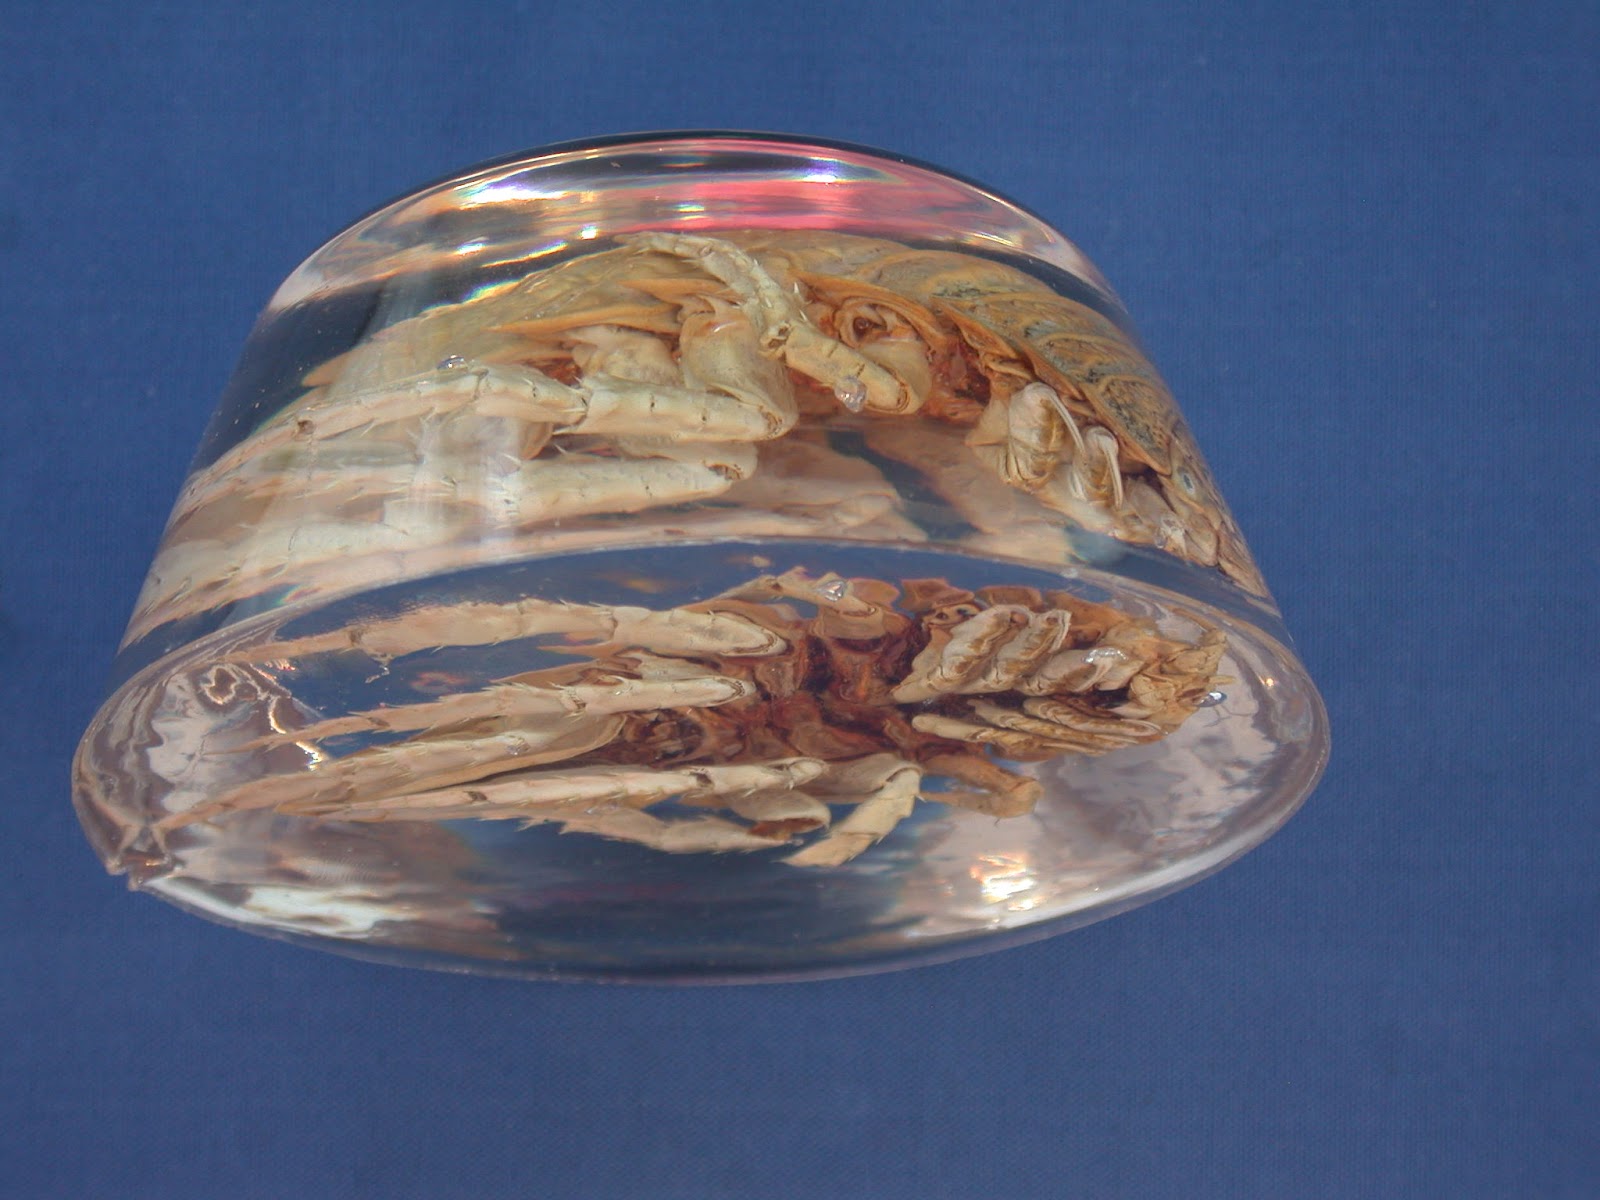
As promised, here are some photos of our brand new isopod paperweight!


By Ben Segee

Thursday, March 29, 2012

Tribute to Scott

You may remember way back in December we celebrated 100 years at the South Pole. The south pole was reached by two different teams within almost a month of each other. The first team to reach the pole was the Norwegian explorer Roald Amundsen. The second team was led by the British explorer Robert Scott. Roald Aundsen's expedition went quite smoothly. Scott's on the other hand, did not. Scott and his 5 man team reached the pole on January 17th, but getting there was only half the battle, because they then had to make the 800 mile return trip.

On Feburay 7th, one of Scotts men, Edgar Evens, died of hypothermia.

On March 16th,  Lawrence Oats, who was in very poor health and knew he was slowing the team down gave his famous quote, "I am just going outside and may be some time," and then left the team in hopes that they would survive.

On March 19th, a blizzard kicked up, forcing the remaining three men to make camp to wait out the storm. This was the last camp made by the team. Scotts last journal entry was on March 29th, 100 years ago today, and he is assumed to have died shortly afterwards.

We pay tribute to Scott today. He died for discovery. He knew that what he was doing was risky, or at the very least difficult and uncomfortable , but went ahead anyways. Science, is ultimately about discovery and so any man who is willing to live and die for it is worthy of our respect.

Scotts Team at the South Pole. 

"We took risks, we knew we took them; things have come out against us, and therefore we have no cause for complaint, but bow to the will of Providence, determined still to do our best to the last ... Had we lived, I should have had a tale to tell of the hardihood, endurance, and courage of my companions which would have stirred the heart of every Englishman."

For a more detailed account of Scotts expedition, CLICK HERE!

By Ben Segee

Monday, March 26, 2012

Antarctic Isopods

How many of you know what an isopod is?

If you do, that's FANTASTIC!

If you don't, well don't feel bad because if you keep reading you will.

Isopods are crustaceans. Crustaceans are organisms that have an exoskeleton, segmented bodies, and jointed limbs. This group includes not only isopods but also crabs, lobsters, shrimp, and many more.

Pictured: A crustacean.

Isopods are specifically crustaceans that have flat bodies and seven pairs of limbs. Some species of isopods live on land, while others live in the water. You may be familiar with a common terrestrial (lives on land) isopod, known as the pill bug.

Trust us, there are seven pairs of limbs there.


We currently have in our lab some exoskeletons of some Giant Antarctic isopods. Giant Antarctic Isopods live in aquatic environments and, as can be expected from the name, are quite large.

 For more isopod photos CLICK HERE!

These guys were caught by a trawler off the Antarctic Peninsula.

This bit.

The handy thing about only having the exoskeletons, is that exoskeletons are made out of chitin, a material that doesn't rot, so we don't need to keep them refrigerated or anything like that. The downside though, is that the skeletons are very fragile. To help prevent them from breaking we are planning on encasing them in clear plastic. then we can use them as visual aids for classes and presentations, or just as paperweights, whichever comes first. Because these isopods come from the Antarctic, it is rather hard to get replacements if we ruin these ones, so we have been practicing encasing things in plastic. Thus far we have had... mixed results.

In a recent practice run, we attempted to encase a small crawfish that we bought at the grocery store. We put it in a glass bowl and poured in the (currently liquid) plastic and then put it in a 90 degree incubator to dry.

Crawfish


A little bit of background information about this plastic. It is pretty straightforward. It starts as a liquid, and a catalyst is added. A catalyst is a substance that helps to speed up a chemical reaction. When the catalyst is added the liquid plastic undergoes a chemical change and becomes a solid. As it hardens, it also becomes a little bit smaller (not much, just a little).

Pictured: SCIENCE!


When the plastic becomes fully hardened it is supposed to shrink and pull away from the mould a bit (this is convinenet because it makes it easy to get the plastic out of the mould). So we allowed our encased crawfish to dry for a few days. And then a few more. Eventually the plastic appeared and felt like it was fully dry, but still it didn't pull away from the mould. We eventually contacted the manufaturer for their advice. They were stumped as to why the plastic never pulled away from the mould and reccomended that we simply break the mould to get the plastic out. The bowl was a cheap dollar store glass bowl and was easily replaceable so we decided to give it a try.

We laid down some cardboard to collect any broken glass from the bowl. We put the bowl down and got a hammer and gave it a wack. To our surprise, nothing happened. We hit the bowl a second time, a little bit harder, and still nothing happened. With a little more power, we gave the bowl one more wack.

Now, how many of you have ever heard of Pyrex? It is a type of glass that is used in a lot of glass cookware. It's quite popular because, unlike normal glassware, it is virtually unbreakable. But when it breaks, it breaks a lot. 

Pictured: Broken Pyrex.

As you probobly have already guessed, our bowl was in fact made of Pyrex. To say that the last hammer hit broke the bowl is a bit of an understatment. A more accurate word would be disintergreated, shooting tiny shards of glass all across the lab.

Unfortunately, the glass didn't absorb the full force of the hammer, and the plastic encasing the crawfish cracked.

As it turned out, the plastic did shrink a little bit. It didn't shrink enough to pull away from the mould, but it did shrink enough to put some pressure on the crawfish. Also, as it turns out, if a fish is kept for a long period of time at 90 degrees, even if it is encased in plastic, it still spoils. So as soon as the crack in the plastic appeared, the pressure on the craw fish had an escape route, so up through the crack squirted a fair amount of rotten craw fish juice.

There is a reason you have never seen this flavor.


But apart from ruining the plastic embedment, covering the lab with broken glass and making everything smell like a poorly maintained fish market, things went pretty well. We are now working on the real deal and will post pictures just as soon as we are done.


Once again, if you would like to see more about Giant Antarctic Isopods CLICK HERE!

By Ben Segee

Friday, March 9, 2012

Time to prepare for the NEXT field season.


Word of the day is   SIP

I know it sounds like a long time from now but we have to start preparing for our trip to Antarctica next October!

Yes, we are going back to the volcano, the desert, under sea and the mountains of Antarctica collect our microbe traps.  Here is a little map of the area with the sites we will be visiting.


But before we can go we need to have all of our logistics in place and that means we need food, fuel and shelter.  All these things are provided for us by the Antarctic support contractor working for the National Science Foundation (NSF).

This is the time of year we begin dealing with lots of acronyms! 

And that brings us to our word of the day, SIP. 

Our SIP is the Support Information Package. This is an online form that describes support logistics, equipment and supplies requested by science groups.

Planning is very important- we want to make sure we have enough sleeping bags and tents for everyone.  It would be a bummer if you got to your field camp only to discover you didn’t have a tent.


The support service has to plan for how many people will be in Antarctica and how they will move from place to place.  That means they need to have fuel on hand and helicopters and snowmobiles and airplanes and tracked vehicles…   The list goes on.

We need to put each and every trip we will take into the SIP, how many people, where we will go and on what days 7 or 8 months from now! 

Good planning is critical for a successful field season. 

So, its back to the computer to begin filling out our SIP.

Wednesday, February 22, 2012

Carbon cycling in Antarctic psychrophilic yeasts: A new collaborative study


This winter, we started a new study investigating the unique metabolism of a couple of species of psychrophilic yeasts (Dioszegia cryoxerica and Cryptococcus vishniacii). Psychrophilic organisms are restricted to growth below 20oC, and these particular yeasts use unique metabolic carbon pathways. The yeasts used in this study may be of interest to the energy industry as potentials for the production of biofuels due to their unique metabolism.

This collaborative study consists of two parts: we handle the culturing and the “quenching” of the yeasts, and then the samples are sent to Dr. Joseph Dalluge at University of Minnesota so that he can study how growth at different temperatures affected their metabolism. Quenching refers to suddenly stopping the metabolism of the entire yeast culture by flushing it with large volumes of 60% methanol solution. Then the yeast cells are removed from both the quenching solution and the media in which they grew by centrifugation. The yeast cells, and samples of the quenching solution and the media were then sent to Joe for further analysis. We’re excited to find out how our little critters did!


Dr. Joseph Dalluge, Director of the Mass Spectrometry Facility at the University of Minnesota


Adding the quenching solution to the yeast culture


Keeping the quenched culture (left) and 60% methanol solution for future quenching (right) cool at -50oC


Now that the culture has been quenched, we need to centrifuge the cells out of the solution. We do this in a pre-chilled centrifuge to make sure our samples stay cold.